An introduction and tutorial for training machine learning motion prediction models using Lyft Level 5’s Prediction Dataset
By: Luca Bergamini, Software Engineer; Vladimir Iglovikov, Software Engineer; Filip Hlasek, Engineering Manager; and Peter Ondruska, Head of Level 5 Research
Predicting the behavior of traffic agents around an autonomous vehicle (AV) is one of the key unsolved challenges in reaching full self-driving autonomy. With our Prediction Dataset and L5Kit, you can start building motion prediction models in a free afternoon or weekend — even if you have no prior AV experience. If successful, you can help propel the self-driving industry forward as a whole, and even win part of our $30,000 prize pool if your solution lands among the best in our Kaggle competition.
What is motion prediction and why is it important?
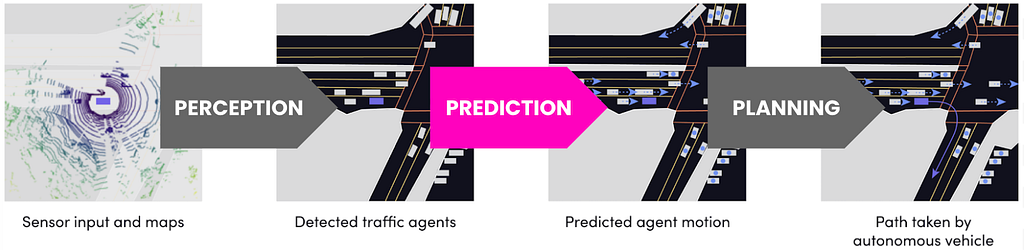
Let’s start with how the self-driving car works. Within the AV stack, the first step toward building a self-driving system is perception (identifying what’s around us). The next two tasks are prediction (determining what will happen next) and planning (deciding what the AV is going to do in the future). We’re focusing on this second task.
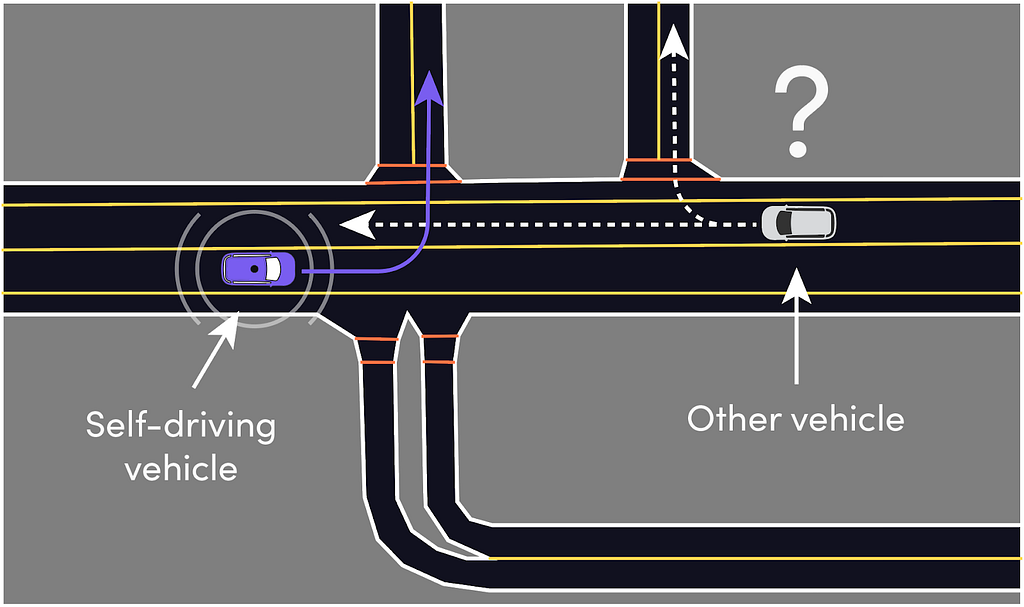
AVs need to be able to make predictions about the future — something drivers do subconsciously all the time. Imagine an AV trying to turn left while another car is approaching from the opposite direction. In order for the AV to perform this maneuver safely, it needs to determine whether the other car will turn right or continue driving straight and interfere with the left turn. This is exactly what motion prediction is about.
While perception is considered production-ready within the industry, prediction and planning still need improvement. Why are these later parts of the AV stack still unsolved for AVs?
Today, models for motion prediction and planning are mainly built using rule-based systems. However, the future is uncertain and rules may not always scale well with uncertainty. As you add other agents into the mix, the number of rules and costs grow exponentially. A deep supervised learning approach could address that, but you need a lot of data to properly capture rare and unexpected behaviors of the road. Good news: our Prediction Dataset is the largest of its kind and includes these rare behaviors.
Training your model
To train your model, you need to:
- Download Lyft Level 5 Prediction Dataset
- Get input and output for the Task
- Define the Model
- Train the Model
We prepared a Jupyter notebook to make these steps simple.
1. Download Level 5 Prediction Dataset
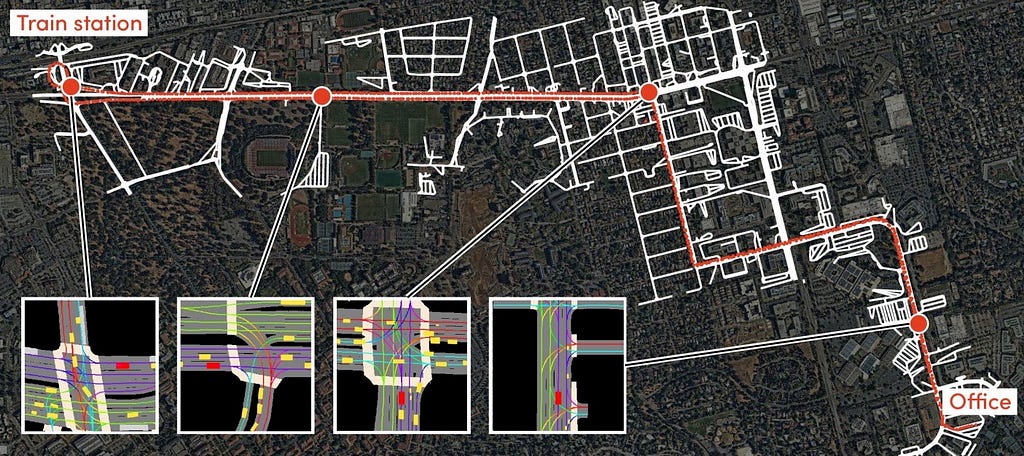
Visit our Prediction Dataset webpage to register and download the dataset. This dataset includes more than 1,000 hours of driving data over 16,000 miles collected by our fleet of AVs in Palo Alto, California. We’ve already run the dataset through our internal production perception stack since building prediction models is hard to do efficiently when starting with raw data. This means you can immediately get started building motion prediction models for traffic agents already identified in our perception outputs, and measure your progress against our ground truth.
In addition to the data, we’ve also included an aerial map and high-definition semantic map annotated by Level 5 researchers. You can read about it more here.
2. Getting input and output for the task
The Prediction Dataset registers the world around the AV at different timestamps. Each timestamp includes:
-
A frame
A frame is a record of the AV itself. It contains its location and rotation, as well as a list of all the agents and traffic lights detected around it in that instant. -
Agents
An agent is a movable entity in the world. Agents are labeled with a class (car, pedestrian, etc.) and position information. Agents also have unique IDs, which are tracked between consecutive frames.
Getting information for frames and agents is as simple as running this snippet of code:
https://medium.com/media/13a7a3bd3ba93f5177be37cec4439304/href
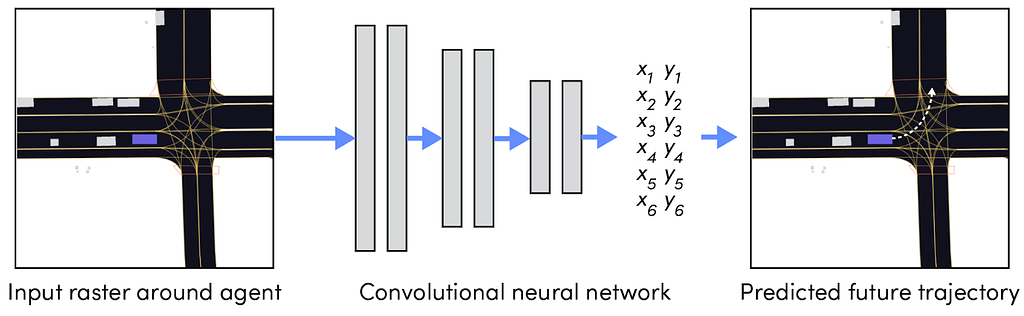
A common choice when working with AV data is to use Bird’s-Eye View (BEV) rasterization for the system’s input, which consists of top-down views of a scene. This simplifies building your models because the coordinate spaces of the input and output are the same.
Getting BEVs and output trajectories ready for training a DCNN is a matter or few lines:
https://medium.com/media/b7d4048fdb4c8e839384a915bc567642/href
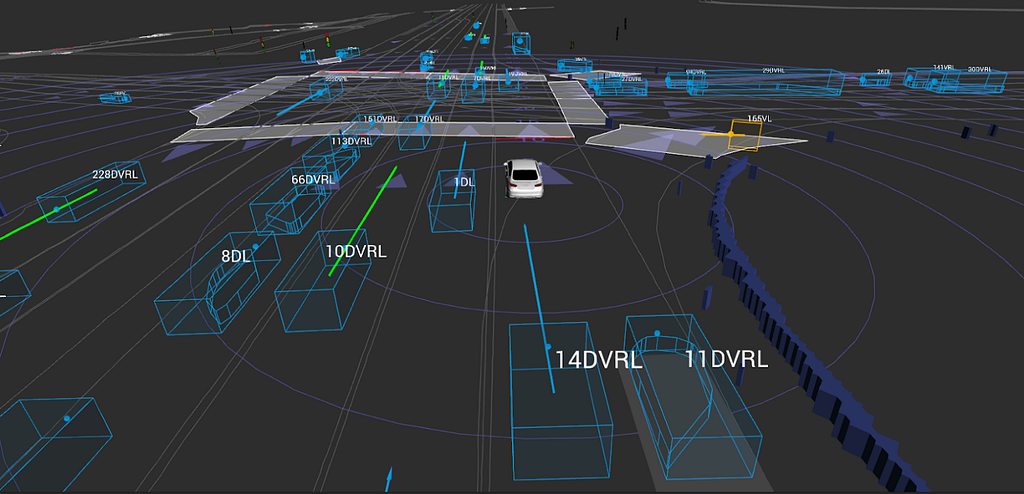
Input BEVs overlaid on our HD semantic maps looks like this:

3. Define the model
Define a model to train using your inputs and outputs. You can create a simple baseline by adapting a standard CNN architecture (e.g. ResNet50) to your needs. While you can leave the central part of the network as-is, you’ll need to change its input and output layers to match your setting.
To do this, match the number of channels in the first convolutional layer to the one in the BEV. A 3-channel convolutional layer is not enough to rasterize different semantic information in different layers. Next, make sure the number of outputs matches your future prediction horizon multiplied by each timestep element (XY displacements are used in the example below). For a horizon of 50 steps, you’ll need a total of 100 neurons in the last layer of our network.
In PyTorch this looks like:
https://medium.com/media/668f33bdbf9e995ee0bfcac00fe091be/href
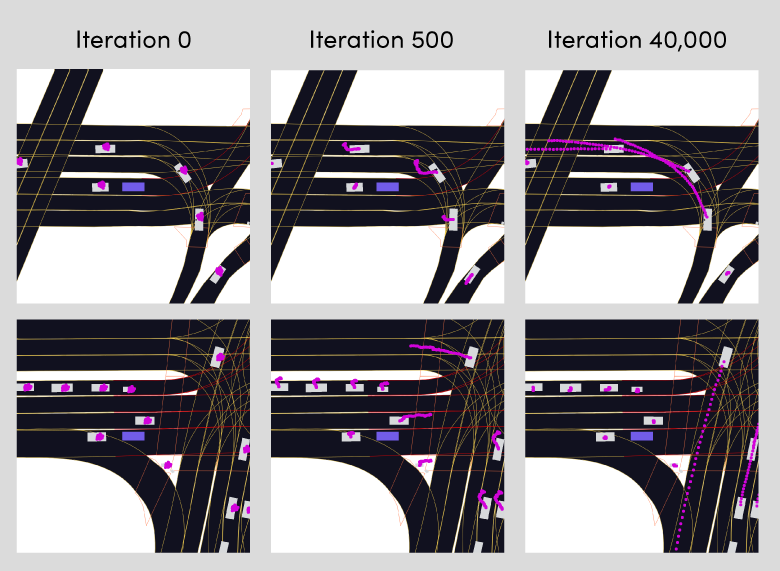
4. Train the model
You’re now ready to train the baseline model on the data. The model will be fed with BEV inputs and asked to predict future trajectories. You can set up a Mean Squared Error (MSE) criterion and optimize the network using the ADAM optimizer. In PyTorch this looks like:
https://medium.com/media/30adaf607ec1e10bc60e3f10e45e148c/href
We can also plot the predicted trajectories on BEV rasters centered around the AV after a few iterations.
We hosted a live demo (skip to 20:19) if you want a deeper dive on our codebase and dataset.
Take your model a step further
Here are some ideas and tips to improve and experiment with your model:
- Simply replace the first and last layer if you’re striving for speed and want to replace ResNet with the lighter EfficientNet.
- Want to see if an agents’ history can improve performance? That’s just a matter of changing a configuration value and everything works out-of-the-box.
- You can increase the raster’s resolution and even change its aspect ratio if it looks too coarse.
- Is one trajectory per agent not enough to capture the uncertainty? We already provide metrics to score multi-modal predictions, so you can know straight away if your model improves.
Enter the Kaggle Competition
Now that you have your model ready, are you up for a challenge? Our Kaggle competition is live and participants are already breaking records on the leaderboard. Submissions are increasing rapidly and there are still 2 months to compete for the $30,000 prizes.
Here are some tips if you’ve never submitted to Kaggle:
- Add your phone number to unlock GPU training if you’re not already registered on Kaggle.
- Our L5Kit is already included in the Kaggle environment, so you can still use your local workflow.
- If you’re curious about top scorer solutions, chances are they have already shared them in the notebooks section. It’s a good place to start if you’re looking for some inspiration.
- We have a specific TPU workflow included if you happen to be a TPU star!
We’re excited to be able to empower the research community to innovate, illuminate important unsolved challenges in self-driving, and propel the self-driving industry forward as a whole with this dataset and competition. We wish you the best of luck in the competition and can’t wait to see what you come up with as you build your models!
Follow @LyftLevel5 on Twitter and this blog for more information about self-driving at Lyft, and visit our careers page to see open roles at Level 5.
How to Build a Motion Prediction Model for Autonomous Vehicles was originally published in Lyft Level 5 on Medium, where people are continuing the conversation by highlighting and responding to this story.