
Track your assets with cloud-based, serverless technology
A devlog on Pulumi libraries, AWS Cloud, and Mapbox APIs
![]() MapboxBlockedUnblockFollowFollowingJun 13
MapboxBlockedUnblockFollowFollowingJun 13
With 8 billion+ connected IoT devices and 2 billion GPS-equipped smartphones already online, logistics businesses are tracking assets at every step in the supply chain. At this scale and complexity, it is imperative to have a flexible way to ingest, process, and act upon this data, without sacrificing security or best practices.
We launched our Asset Tracking Solution Architecture to help developers in the logistics space meet this need. The architecture features Pulumi’s open source JavaScript libraries (AWS, AWSX) available with multi-language support, with Pulumi Crosswalk for Amazon Web Services (AWS), a new, open source framework that streamlines creation, deployment and management of AWS applications and infrastructure with built-in AWS Best Practices using just a few lines of code in common programming languages.
Check out the devlog below from the Pulumi and Mapbox teams to see how you can build this architecture for your own organization. Check out the joint webinar to see it all in action.
By: Chris Toomey, Solutions Engineer, Mapbox; Nishi Davidson, VP Product & Solutions, Pulumi
In this devlog, we’ll show snippets of the Javascript code that demonstrates how to use the Pulumi solution to program AWS services APIs in coordination with Mapbox APIs to track your assets. For access to the full codebase, please reach out to the Mapbox solutions team (chris.toomey@mapbox.com) and the Pulumi team (sales@pulumi.com).
Prerequisites:
Install PulumiInstall Node.js version 8 or later that comes with the package manager (npm)Setup AWS Cloud
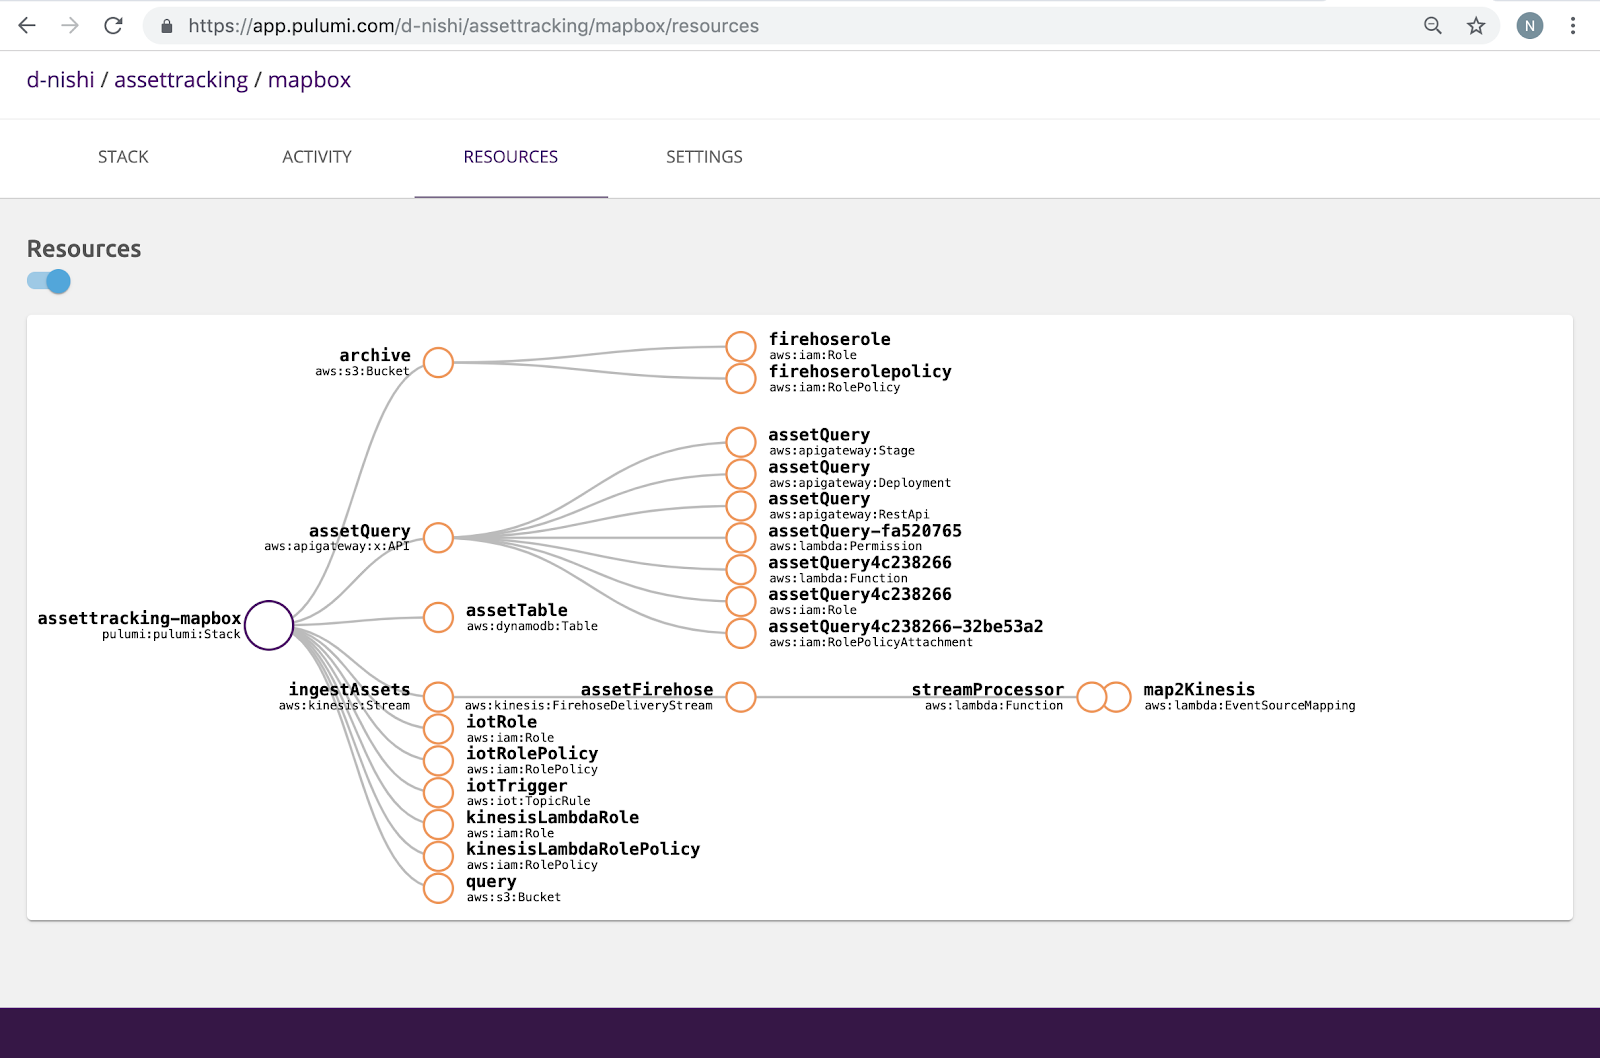
The diagram represents how Mapbox’s solution design on AWS services is built with Pulumi AWS and AWSX libraries in Javascript. Data is ingested in the Asset tracking IOT solution with a REST API. We used Mapbox stream processing to perform enrichments such as geofencing, traffic-aware ETA calculations, and high-precision elevation. This data, exposed by the API, is backed by a high-performance database (DynamoDB) to enable visualization in real-time on the map client.

We used Pulumi Service console to map our cloud architecture shown above as a connected set of DAG resources, so we don’t need to remember what we deployed as our cloud environments scale.
STEP 1: Create a Pulumi project using an AWS JavaScript template
STEP 2: Create the ingestion REST API with AWS Services
To visualize data, the system has to accept large volumes of data from multiple sources into the rest of the system. We used Pulumi’s AWS & AWSX libraries to build an IOT ingestion rule and forward it to Kinesis streams. A sample `index.js` looks like this:
We used Kinesis streams to ingest data into multiple AWS services defined as IOT rules, Firehose and Lambda functions. Each ingest stream has the right IAM role and policy to allow Kinesis to send the data into these AWS services.
STEP 3: Create a consumption API for the map client to consume from a data source
Once, data is flowing through the system we built another API to query DynamoDB, transform that data, and provide it to our mapping client in geoJSON. With Pulumi AWSX, we created an API Gateway endpoint API that can query this data out of DynamoDB. The sample code in `index.js` looks like this:
Once we created the API, we started defining our routes, and then in-line we defined a Lambda function. The function can even use NPM modules and Pulumi will handle bundling all the dependencies.
This endpoint assumes we are querying Dynamo, so we used the DynamoDB Document Client. Using that straightforward scan syntax, we queried the table and started to parse our results. Since every data point has a latitude and longitude as GeoJSON, the data is transformed using Turf.js before sending to the client. Pulumi handles the heavy lifting of packaging, deploying, and giving you the endpoint to query immediately.
STEP 4: Hook up a map
Once we had data coming and going from our solution, we just had to hook it up to a Mapbox map. We pasted in the endpoint from Pulumi and selected our interval (following this example).
And voila — we have a cloud-based, serverless solution that can track assets accurately, in real-time.
To access all the code for this asset tracking solutions architecture, please reach out to the Mapbox solutions team (chris.toomey@mapbox.com) and the Pulumi team (sales@pulumi.com).
To learn more about solutions from Mapbox, Pulumi and AWS, please visit:
https://docs.mapbox.com/https://github.com/pulumi/exampleshttps://aws.amazon.com/blogs/apn/Nishi Davidson – Seattle, Washington | Professional Profile | LinkedInView Nishi Davidson’s profile on LinkedIn, the world’s largest professional community. Nishi has 6 jobs listed on their…www.linkedin.comChris ToomeyChris works on our Sales Engineering team where he focuses on building and integrating Mapbox into the next generation…www.mapbox.com
Go to Source